PlantUML 소개
PlantUML은 여러 시스템과 편집기에서 텍스트로 다이어그램을 그릴 수 있는 도구입니다. 텍스트 설명을 기반으로 시퀀스 다이어그램, 플로우차트, 유스케이스 다이어그램, 상태 다이어그램, 컴포넌트 다이어그램 등을 생성할 수 있습니다.
- Idea, VS Code, PyCharm 등 편집 도구에 플러그인 형태로 통합 가능
- Java와 오픈소스 이미지 렌더링 라이브러리인 Graphviz를 사전 설치해야 정상 작동
- 해당 문법을 숙지해야 함
관련 링크
- 공식 사이트: https://plantuml.com/
- 중국어 공식 사이트: https://plantuml.com/zh/
- GitHub: https://github.com/plantuml/plantuml
- 온라인 도구: http://www.plantuml.com/plantuml/uml/
- 다운로드: https://plantuml.com/zh/download
- 사용자 가이드: https://plantuml.com/zh/guide
- 배포 다이어그램 가이드: https://plantuml.com/zh/deployment-diagram
- VS Code 플러그인: https://marketplace.visualstudio.com/items?itemName=jebbs.plantuml
예제 - VS Code 사용
VS Code 편집기에서 PlantUML 플러그인을 사용하여 텍스트로 다이어그램을 그립니다.
markdown 형식 파일에 내용을 작성할 수 있습니다.
미리보기 기능을 지원하며, 구문 오류가 발생하면 미리보기 인터페이스에 구체적인 힌트가 표시됩니다.
출력 파일
1. 명령 팔레트(Ctrl+Shift+P)에서 'plant'를 입력하고, 드롭다운 목록에서 "PlantUML: Export Current File Diagrams"를 선택합니다.
2. 안내에 따라 파일 형식을 선택합니다.
3. 완료되면 "Diagram exported successfully"라는 메시지가 나타나며, 다이어그램을 확인할 수 있습니다.
@startuml

title This is a sample!
/' left to right direction
두 번째 주석
'/

'######## Application Server ########'
frame System {
node Server1 [
    Server1
    IP: 1.1.1.1
    Port: 1111
    ]
node Server2 [
    Server2
    IP: 2.2.2.2
    Port: 2222
    ]
}

'######## MiddleWare ########'
frame MiddleWare {
component Nacos [
    Nacos
    IP: 7.7.7.7
    Port: 7777
    ]
component Nginx [
    Nginx
    IP: 8.8.8.8
    Port: 8888
    ]
}

'######## Database ########'
database DB #aliceblue;line:blue;line.bold;text:blue [    /'스타일 지정'/
    DB
    IP: 6.6.6.6
    Port: 6666
    ]

'######## Others ########'
storage Storage_1 as "Storage_X"    /'별칭 지정'/
artifact Artifact_1
cloud Cloud_1
card Card_1
file File_1 #aliceblue;line:blue;line.dotted;text:blue

card C_foo
card C_left
card C_right
card C_up
card C_down

'######## Links ########'
C_foo -left-> C_left    /'방향을 지정한 화살표 연결, left, right, up, down 사용 가능'/
C_foo -right-> C_right
C_foo -up- C_up
C_foo -down- C_down

Server1 --> DB    /'수평 방향 화살표 연결'/
Server1 --> Nacos
Server1 --> Nginx
Server2 == DB    /'굵은 연결선'/
Server2 .. Nacos    /'점선 연결'/
Server2 ~~ Nginx    /'점 연결선'/

DB -[#orange]-> Server1
DB -[#blue;thickness=3]-> Server2 : [input text]

Storage_1 ---> Artifact_1 /'길이가 증가한 수평 방향 연결'/
Storage_1 -> Cloud_1    /'수평 방향 짧은 화살표 연결'/
Cloud_1 ==> Card_1    /'아래 방향 굵은 연결 지정'/
Card_1 <=[#green]=> File_1    /'수평 양방향 굵은 연결'/

@enduml
예제 - plantuml.jar 사용
설치 및 구성
# Open-JDK 설치 및 구성
- https://download.java.net/openjdk/jdk8u42/ri/openjdk-8u42-b03-windows-i586-14_jul_2022.zip
- 시스템 환경 변수 path에 추가 필요

# graphviz 설치 및 구성
- https://graphviz.org/documentation/
- https://graphviz.org/download/
- https://gitlab.com/api/v4/projects/4207231/packages/generic/graphviz-releases/7.0.5/windows_10_cmake_Release_graphviz-install-7.0.5-win64.exe

설치 과정에서 반드시 "Add Graphviz to environment variable" 옵션을 선택하고, 설치 완료 후 버전을 확인합니다.
$ dot -V
dot - graphviz version 7.0.5 (20221223.1930)

# plantuml 설치 및 구성
- https://plantuml.com/zh/download
- https://github.com/plantuml/plantuml/releases/download/v1.2022.14/plantuml-1.2022.14.jar
다운로드 후 plantuml.jar로 이름을 변경하고 고정된 디렉터리에 저장합니다.
plantuml.jar 사용
# 명령줄에서 PlantUML 실행

# 1 - sample.txt 텍스트 파일을 생성하고, 내용은 다음과 같습니다.
@startuml
Alice -> Bob: test
@enduml

# 2 - 명령줄에서 다음 명령 실행
java -jar plantuml.jar sample.txt

# 3 - 명령 실행 후 동일한 이름의 png 형식 파일이 생성됩니다.
실행 과정
C:\TPS\PlantUML>dir
 드라이브 C의 볼륨은 WinOS입니다.
 볼륨 일련 번호는 046F-EDEC입니다.

 C:\TPS\PlantUML 디렉터리

2023/01/03  23:21    <DIR>          .
2023/01/03  23:21    <DIR>          ..
2023/01/03  22:30        11,349,479 plantuml.jar
2023/01/03  23:06               939 sample.txt
               2개 파일     11,350,418 바이트
               2개 디렉터리 187,064,942,592 사용 가능 바이트

C:\TPS\PlantUML>java -jar plantuml.jar sample.txt

C:\TPS\PlantUML>dir
 드라이브 C의 볼륨은 WinOS입니다.
 볼륨 일련 번호는 046F-EDEC입니다.

 C:\TPS\PlantUML 디렉터리

2023/01/03  23:30    <DIR>          .
2023/01/03  23:30    <DIR>          ..
2023/01/03  22:30        11,349,479 plantuml.jar
2023/01/03  23:30            26,234 sample.png
2023/01/03  23:06               939 sample.txt
               3개 파일     11,376,652 바이트
               2개 디렉터리 187,064,913,920 사용 가능 바이트

C:\TPS\PlantUML>
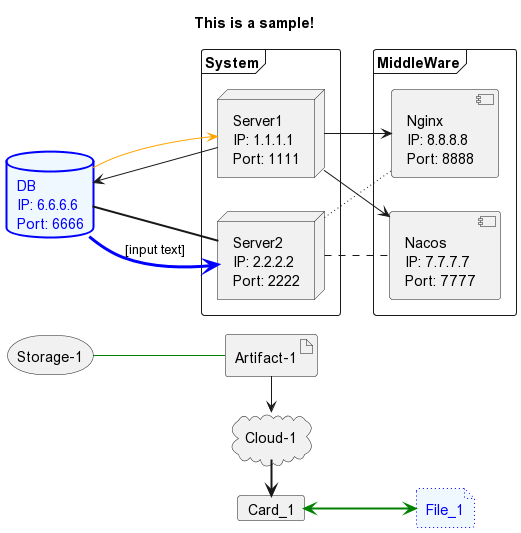
Sample 텍스트 파일 내용
@startuml

title This is a sample!

left to right direction

frame System {
node Server1 [
    Server1
    IP: 1.1.1.1
    Port: 1111
    ]
node Server2 [
    Server2
    IP: 2.2.2.2
    Port: 2222
    ]
}

frame MiddleWare {
component Nacos [
    Nacos
    IP: 7.7.7.7
    Port: 7777
    ]
component Nginx [
    Nginx
    IP: 8.8.8.8
    Port: 8888
    ]
}

database DB1 #aliceblue;line:blue;line.bold;text:blue [
    DB
    IP: 6.6.6.6
    Port: 6666
    ]

storage Foo1 as "Storage-1"
artifact Foo2 as "Artifact-1"
cloud Foo3 as "Cloud-1"
card Card_1
file File_1 #aliceblue;line:blue;line.dotted;text:blue

Server1 --> DB1
Server1 --> Nacos
Server1 --> Nginx

Server2 == DB1
Server2 .. Nacos
Server2 ~~ Nginx

DB1 -[#orange]-> Server1
DB1 -[#blue;thickness=3]-> Server2 : [input text]

Foo1 -[#green]- Foo2
Foo2 -> Foo3
Foo3 => Card_1
Card_1 <=[#green]=> File_1

@enduml
다이어그램 결과